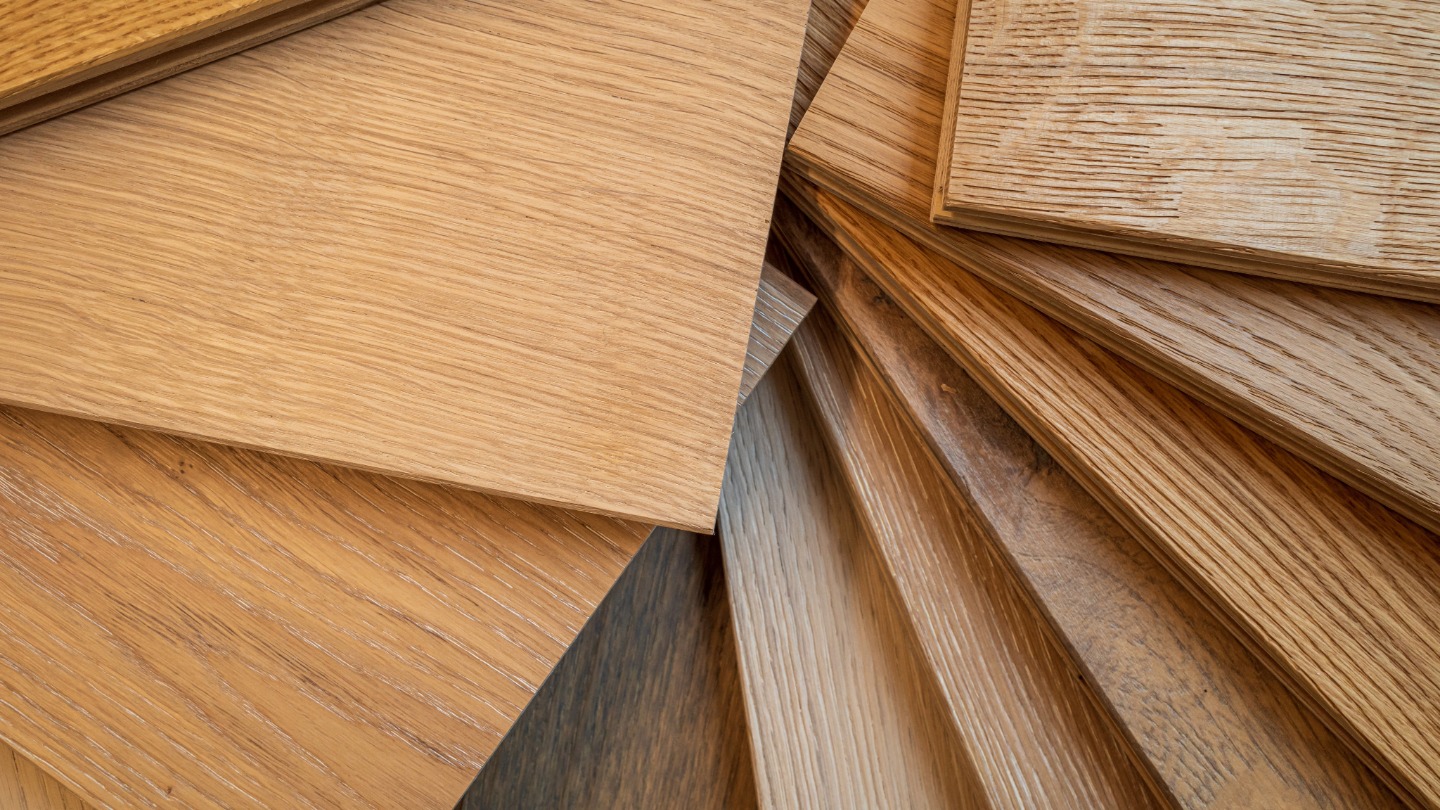
You know, when you’re thinking about new flooring, it’s easy to get caught up in the colours and textures. But what’s underneath? That’s where the real story is, especially with something called a Sub-Floor Moisture Barrier. This isn’t just some extra bit of plastic; it’s a key player in keeping your home dry and healthy. If it fails, you’re looking at a whole heap of trouble, from warped floors to nasty mould. We’re going to talk about why these barriers are so important, what happens when they don’t work, and how you can make sure yours stays in top shape. It’s all about avoiding those hidden problems that can cost you a fortune down the line.
Key Takeaways
- Sub-Floor Moisture Barriers are vital for protecting your home from damp, preventing issues like mould and structural damage.
- Understanding the difference between moisture barriers and vapour barriers is important for correct installation and function.
- Common reasons for barrier failure include poor installation, using the wrong materials, and not preparing the site properly.
- When a barrier fails, it can lead to expensive floor repairs, damage to the building’s structure, and poor indoor air quality due to mould.
- To keep your barrier working well, always use good quality materials, get professionals to install it, and check it regularly for any problems.
.
Understanding Sub-Floor Moisture Barriers
The Crucial Role of Sub-Floor Moisture Barriers
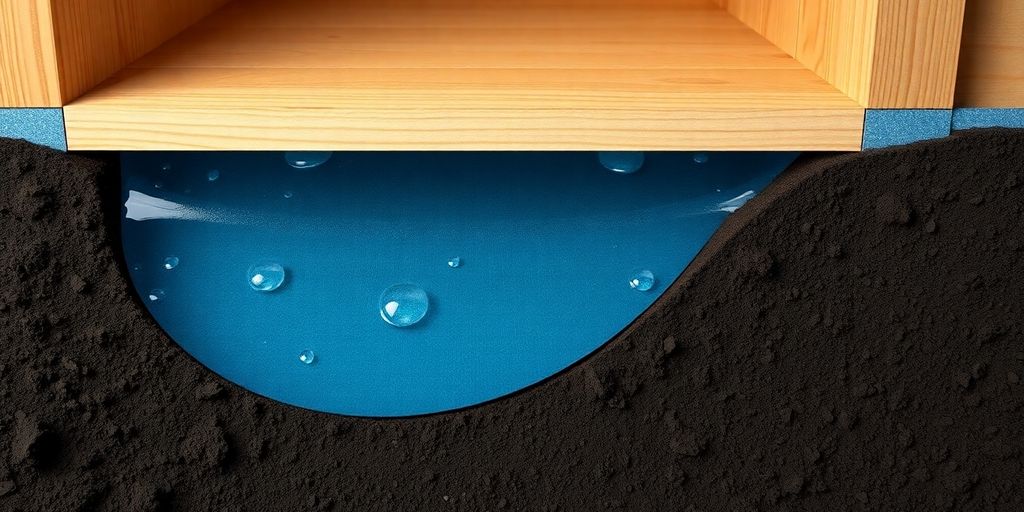
Sub-floor moisture barriers are really important, and often overlooked, when it comes to building and maintaining a property. Their primary job is to stop moisture from the ground affecting the structure above. Think of it like this: the ground is always going to have some level of moisture, and without a barrier, that moisture can creep up into your floors, walls, and even the air inside your home. This can lead to a whole host of problems, from mould growth to structural damage. It’s not just about keeping things dry; it’s about protecting your investment and your health. A good moisture barrier is a proactive measure that saves you money and hassle in the long run. It’s a bit like insurance – you hope you don’t need it, but you’re really glad it’s there if things go wrong.
- Preventing moisture-related damage
- Maintaining structural integrity
- Improving indoor air quality
.
Ignoring the need for a sub-floor moisture barrier is like skipping the foundation of a house. It might seem okay at first, but eventually, the problems will surface, and they’ll be much bigger and more expensive to fix than if you’d just done it right from the start.
Distinguishing Moisture Barriers From Vapour Barriers
Okay, so moisture barriers and vapour barriers – people often use these terms interchangeably, but they’re not quite the same thing. A moisture barrier is designed to stop liquid water from getting through. Think of heavy rain or groundwater. A vapour barrier, on the other hand, is designed to slow down the movement of water vapour. This is the stuff that’s in the air, like humidity. The key difference is the level of protection they offer. Moisture barriers are much more robust and are used in situations where there’s a high risk of water exposure, like under concrete slabs. Vapour barriers are more about managing humidity levels within a building. Choosing the right one depends on your specific needs and the climate you live in. For example, in colder climates, you want to stop warm, moist air from inside the house getting into the walls and condensing, so you’d use a vapour barrier on the warm side of the insulation. It’s all about understanding the specific challenges your building faces.
Key Locations for Sub-Floor Moisture Barrier Installation
Where you put your sub-floor moisture barrier is just as important as choosing the right type. Here are some common spots where they’re absolutely essential:
- Under concrete slabs: This is probably the most common location. Concrete is porous and can draw moisture up from the ground. A barrier here prevents that moisture from reaching your flooring and causing damage.
- Crawl spaces: Crawl spaces are notorious for being damp and musty. A moisture barrier here can significantly reduce humidity levels and prevent mould growth. It’s often a good idea to cover the entire floor of the crawl space with a heavy-duty plastic sheet.
- Basements: Even if your basement is finished, a moisture barrier is a good idea. It can help prevent water from seeping through the walls and floor, keeping your basement dry and comfortable. Consider subfloor prep for optimal results.
.
| Location | Why it’s Important that can be a problem. It’s also worth noting that local building codes and regulations might have specific requirements for moisture barriers, so it’s always a good idea to check those out before you start any work.
Common Causes of Sub-Floor Moisture Barrier Failure
It’s a pain when things go wrong, especially when it comes to something as important as your sub-floor moisture barrier. Loads of problems I see come down to a few key areas. It’s usually not rocket science, but more often than not, it’s cutting corners or not paying attention to detail that causes the biggest headaches. Understanding where things typically go wrong can save you a fortune in the long run. Commercial property owners spend a lot of money addressing moisture-related problems, so getting it right from the start is key.
Poor Installation Methods and Their Impact
Installation blunders are a massive reason why moisture barriers fail. Even top-notch materials are useless if they’re not put in properly. Think about it – rushed jobs, skipped steps, or just plain incorrect sealing can leave gaps and weak spots. It’s like building a house on a shaky foundation; it’s only a matter of time before things start to crumble. I’ve seen it all, from barriers that weren’t properly overlapped to seals that were missed entirely. It’s worth taking the time to ensure proper site preparation and doing it right the first time.
- Incorrect overlapping of seams
- Failure to properly seal around pipes and other penetrations
- Using the wrong type of adhesive or sealant
.
I remember one job where the installers were in such a rush that they didn’t even bother to clean the sub-floor properly before laying the barrier. Needless to say, it didn’t last long. The barrier ended up peeling away from the sub-floor, leaving the whole thing exposed to moisture. It was a complete disaster.
Inadequate Material Selection and Quality
Going cheap on materials is a false economy. Low-quality barriers might seem like a good idea at the time, but they often degrade quickly, leading to tears, punctures, and a whole host of other problems. It’s like buying a cheap car – it might get you from A to B for a while, but it’s not going to last the distance. You need to think about the long term and invest in materials that are up to the job. Here’s a quick comparison:
| Material Type | Pros | Cons |
|---|---|---|
| Polyethylene | Cheap, easy to install | Prone to tears, low durability |
| Polyolefin | More durable than polyethylene | More expensive |
| Epoxy | Excellent moisture resistance | Can be difficult to apply correctly |
Site Preparation Deficiencies and Their Consequences
Poor site preparation is another common culprit. If the sub-floor isn’t properly cleaned, levelled, and dried, the moisture barrier won’t adhere properly. It’s like trying to stick wallpaper to a dirty wall – it’s just not going to work. You need to make sure the surface is clean, dry, and free from any debris. Also, consider the benefits of advanced protective technologies to enhance the barrier’s effectiveness. Things to watch out for:
- Dust and debris preventing proper adhesion
- Uneven surfaces causing stress points on the barrier
- Excessive moisture trapped beneath the barrier
.
The Detrimental Effects of Failed Sub-Floor Moisture Barriers
Flooring Damage and Costly Repairs
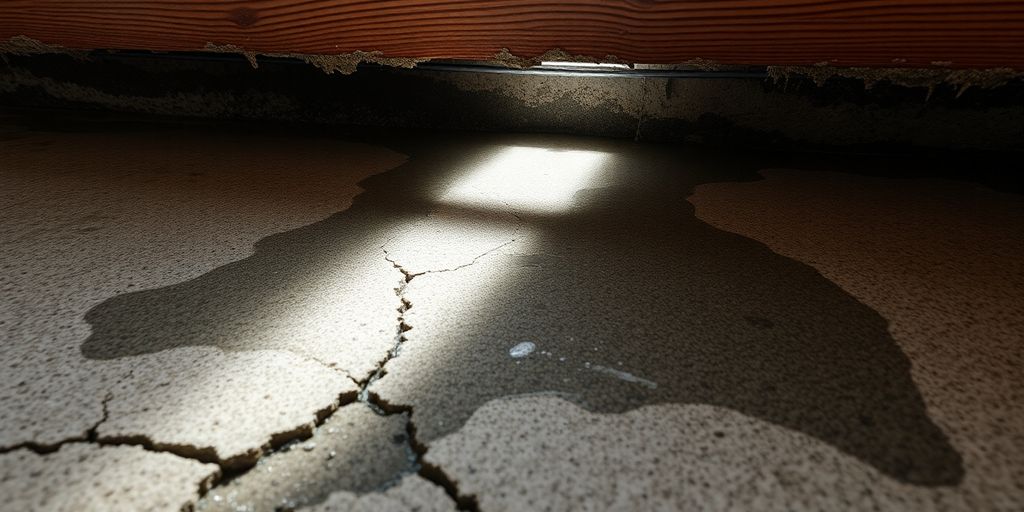
When a sub-floor moisture barrier fails, the most immediate and noticeable consequence is often damage to the flooring itself. Excess moisture can cause wood floors to warp, buckle, or rot, while laminate and vinyl flooring may bubble, peel, or develop adhesive failures. These issues lead to unsightly damage and necessitate costly repairs or even complete floor replacements. The financial burden can be significant, especially in larger properties where extensive areas are affected. It’s not just about aesthetics; compromised flooring can also pose safety hazards, such as tripping hazards from uneven surfaces.
- Warping of wooden floors
- Bubbling in vinyl flooring
- Adhesive failure in tiles
.
Compromised Structural Integrity of the Building
Beyond surface-level damage, a failed moisture barrier can seriously compromise the structural integrity of a building. Persistent moisture seeps into concrete slabs and other foundational components, leading to cracks and weakening. Over time, this can affect the stability of walls, floors, and even the entire building structure. Ignoring these issues can result in major structural problems that are expensive and difficult to rectify. Addressing structural leaks is critical to ensure the barrier performs effectively and protects your investment.
A moisture barrier is only as strong as the building system it supports. Leaks in walls, windows, or roofs can introduce moisture that overwhelms a barrier designed to block ground moisture.
Health Implications From Mould and Mildew Growth
One of the most concerning consequences of a failed sub-floor moisture barrier is the growth of mould and mildew. Damp, dark environments beneath flooring provide ideal conditions for these organisms to thrive. Mould and mildew not only produce unpleasant odours but also release spores into the air, which can trigger allergic reactions, respiratory problems, and other health issues. The presence of mould can significantly reduce indoor air quality and create an unhealthy living or working environment. Regular inspections for early detection are important.
- Allergic reactions
- Respiratory problems
- Reduced indoor air quality
.
Preventing Sub-Floor Moisture Barrier Failures
It’s way easier to prevent sub-floor moisture barrier failures than to deal with the aftermath. Honestly, getting it right the first time saves a load of hassle and expense. The main things that cause problems are dodgy installation, cheap materials, and not prepping the site properly. Sort these out early, and you’ll avoid a lot of headaches later on. Did you know that loads of basements have moisture issues? It just shows how important it is to get moisture barriers sorted from the start.
Prioritising High-Quality Materials
Using good quality materials is absolutely key. Don’t skimp on this! Go for durable options that are actually designed to block moisture effectively. Cheaper materials might seem like a good idea at the time, but they often break down quickly and don’t provide enough protection. It’s worth spending a bit more upfront to avoid problems later. For example, consider materials with built-in vapour barriers for added protection.
The Importance of Professional Installation
Getting a professional to install your sub-floor moisture barrier is a really good idea. They know what they’re doing and can make sure everything is sealed properly. DIY might seem tempting, but mistakes can be costly. Professionals will ensure a proper seal to keep moisture out. They’ll also spot potential problems that you might miss. If you are looking for sports floor repair, make sure to hire a professional.
Ensuring Proper Site Preparation and Curing
Proper site preparation is essential. This means making sure the sub-floor is clean, level, and dry before you even think about installing the moisture barrier. Any cracks or imperfections need to be sorted out first. Also, if you’re working with concrete, make sure it’s fully cured before installing the barrier. Trapping moisture underneath is a recipe for disaster. Here’s a few things to keep in mind:
- Clear any debris and dirt.
- Level the surface to prevent pooling.
- Repair any cracks or holes.
.
Taking the time to prepare the site properly might seem like a pain, but it’s worth it in the long run. It ensures the moisture barrier can do its job properly and protects your building from damp and damage.
Advanced Solutions for Enhanced Sub-Floor Protection
It’s not just about slapping down some plastic sheeting anymore. Modern sub-floor protection has moved on, offering some pretty impressive solutions for keeping moisture at bay. Let’s have a look at some of the more advanced options available.
Innovative Coating Systems for Concrete Sub-Floors
Concrete, while solid, can be a bit of a sponge when it comes to moisture. Traditional barriers can sometimes struggle, especially in areas with high water tables or poor drainage. That’s where innovative coating systems come in. These aren’t your average paints; they’re specially formulated to create a seamless, waterproof layer directly on the concrete.
.
These coatings often incorporate advanced polymers and additives that not only block moisture but also resist chemicals, abrasion, and even UV damage. They can be a game-changer for basements, garages, and other areas prone to dampness.
Benefits of Advanced Protective Technologies
So, what do you actually get from using these advanced technologies? Quite a lot, actually. Here’s a quick rundown:
- Superior Moisture Resistance: They form a complete barrier, preventing water vapour from passing through.
- Increased Durability: Many are designed to withstand heavy foot traffic and resist damage from impacts.
- Enhanced Air Quality: By preventing mould and mildew growth, they help improve the air quality in your home.
- Longer Lifespan: These systems are built to last, reducing the need for frequent repairs or replacements.
.
For example, systems like Penntek Evolution are designed to offer protection that goes beyond traditional barriers.
Long-Term Durability and Performance
Ultimately, you want a solution that’s going to stand the test of time. Advanced sub-floor protection systems are designed with long-term performance in mind. This means they’re not just a quick fix; they’re an investment in the structural integrity and health of your property. Regular subfloor prep is still important, but these systems offer an extra layer of defence, giving you peace of mind for years to come.
Maintaining Your Sub-Floor Moisture Barrier
Regular Inspections for Early Detection
Okay, so you’ve got your sub-floor moisture barrier installed. Great! But don’t just forget about it. Regular check-ups are key. Think of it like going to the dentist – a little look now can save you a massive headache later. I usually try to peek around at least twice a year, especially after heavy rain or during those super humid months. Look for any signs of dampness, mould, or damage to the barrier itself. Catching these things early can prevent them from turning into big, expensive problems.
Addressing Damage Promptly and Effectively
Right, so you’ve spotted some damage. Don’t panic! The important thing is to deal with it quickly. Ignoring it won’t make it go away; it’ll just get worse. Small tears or punctures can often be patched up with a suitable repair tape or sealant. Make sure you use something that’s designed for moisture barriers, though – regular duct tape won’t cut it. For more significant damage, you might need to replace a section of the barrier. If you’re not confident doing it yourself, it’s always best to call in a professional.
Extending the Lifespan of Your Barrier System
Want to get the most out of your sub-floor moisture barrier? Here are a few things I’ve found helpful:
- Keep the area around your foundation clear of debris. This helps with drainage and ventilation.
- Make sure your gutters are clean and working properly. Overflowing gutters can lead to water pooling around your foundations.
- Consider installing a sump pump if you live in an area with a high water table. This can help to keep the sub-floor dry.
.
Proper ventilation is also a big deal. Make sure your crawl space vents are open and not blocked by anything. Good airflow helps to prevent moisture build-up. I had a friend who blocked his vents with insulation during the winter to save on heating bills, and it ended up causing a mould problem. Not worth it!
Here’s a simple table to illustrate the importance of regular maintenance:
| Frequency of Inspection | Potential Issues Detected Early | Potential Savings |
|---|---|---|
| Twice a Year | Small tears, minor dampness | £££ |
| Once a Year | Moderate damage, some mould | ££ |
| Never | Significant structural damage | £ |
The Financial and Health Benefits of Effective Barriers
Avoiding Expensive Structural Repairs
Let’s be honest, nobody wants to deal with unexpected repair bills. A properly installed and maintained sub-floor moisture barrier can save you a fortune in the long run. Think about it: preventing moisture build-up stops rot, mould, and structural damage before they even start. This means fewer call-outs to builders, fewer replacement joists, and a much happier bank balance. Ignoring the problem just means it gets worse, and the costs skyrocket. For example, consider the costs associated with sports flooring that is poorly maintained.
Improving Indoor Air Quality and Health
It’s not just about the money; it’s about your health too. Damp conditions under your floors are a breeding ground for mould and mildew. These nasties release spores into the air, which can trigger allergies, asthma, and other respiratory problems. A good moisture barrier helps keep your sub-floor dry, reducing the risk of mould growth and improving the air quality inside your home. This is especially important for families with young children or people with existing respiratory conditions.
Here’s a quick look at how moisture affects indoor air:
- Increased mould spores
- Higher dust mite populations
- Elevated VOC levels from damp materials
.
Investing in a quality sub-floor moisture barrier is an investment in your family’s health and well-being. It’s about creating a healthier living environment, free from the harmful effects of damp and mould.
Protecting Your Property Investment
Your home is likely your biggest asset, so it makes sense to protect it. A failed sub-floor moisture barrier can lead to significant structural damage, which can reduce the value of your property. By preventing moisture-related problems, you’re not only saving on repair costs but also preserving the long-term value of your investment. Think of it as a form of insurance – a relatively small upfront cost that can save you from a much bigger financial hit down the line. Regular inspections are key to keeping your barrier in top condition.
Having good barriers isn’t just about keeping things safe; it can also save you money and keep people healthy. When you have strong, reliable barriers, you avoid costly accidents and injuries. This means fewer medical bills and less time lost from work. Plus, a safe environment makes everyone feel better and more productive. Want to learn more about how proper barriers can benefit you? Visit our website for details on sports hall flooring installations and refurbishments.
Wrapping It Up
So, there you have it. Getting your sub-floor moisture barrier right isn’t just a nice-to-have; it’s a must. We’ve seen how easily things can go wrong, from dodgy installation to just picking the wrong stuff. But honestly, it’s not rocket science to get it right. Just make sure you’re using good quality materials, get someone who knows what they’re doing to put it in, and give it a quick check now and then. Doing these simple things will save you a load of bother (and cash!) down the line, keeping your home dry and healthy. It’s all about being a bit smart upfront to avoid big headaches later.
Schedule moisture test → Sports Hall Inspection
Frequently Asked Questions
How can I tell if my moisture barrier is failing?
Look out for things like your floorboards warping, cupping, or buckling. You might also see discolouration, especially dark spots, or feel dampness on your floors. A musty smell is another big clue, as it often means mould or mildew is growing underneath. If you spot any of these, it’s a good idea to get it checked out quickly.
What are the most common reasons moisture barriers fail?
The main reasons are usually poor installation, using cheap or wrong materials, or not preparing the ground properly before fitting the barrier. Sometimes, leaks in other parts of the building or cracks in the foundation can also let water in, overwhelming the barrier.
What happens if a moisture barrier isn’t working properly?
A failing barrier can lead to your flooring getting ruined, which is expensive to fix. It can also harm the building’s structure over time, making it less safe. Plus, damp conditions are perfect for mould and mildew, which can make people sick and cause breathing problems.
How can I stop my moisture barrier from failing?
To stop problems, always use good quality materials designed for the job. Get experienced professionals to install it, as they know all the tricks to make sure it’s sealed correctly. Also, make sure the ground or concrete is fully dry and prepared before the barrier goes down.
What’s the difference between a moisture barrier and a vapour barrier?
While both deal with water, a moisture barrier stops liquid water from getting through, like water seeping up from the ground. A vapour barrier, on the other hand, stops water vapour (moisture in the air) from moving through walls or ceilings, preventing condensation and dampness inside the building’s structure.
Are there any new or advanced ways to protect against moisture?
Advanced solutions include special coatings for concrete floors that are much tougher than old-fashioned barriers. These can be super strong, resist UV light, stop slips, and even fight off bacteria. They’re designed to last a very long time and give extra protection.
![Building Regulations Part M: Ensuring Inclusive Access and Safety for UK Leisure Centre Flooring [2026]](https://courtshipflooring.co.uk/wp-content/uploads/2026/07/journalist2F1d57470c-6abc-4bc8-b346-513598794c392Fthumbnail.jpeg)